Homemade Cheese Tortellini

Homemade Cheese Tortellini starts with great homemade pasta. This homemade cheese tortellini is filled with ricotta, Parmesan and fresh spinach. Serve with pasta sauce of your choice, or Italian style in brodo (broth). This is a step-by-step guide to making the perfect dough and turning it into tortellini.
There’s nothing better than fresh pasta and when it’s right, it’s soft and just melts in your mouth.
It is really not as difficult to make as it seems and when you’re done, you feel proud that you made something from scratch that the Italians have been doing for centuries.
Making homemade pasta dough
The dough is just 2 ingredients, eggs and flour. Working right on the kitchen counter, start with a mound of flour and make a well for the eggs.
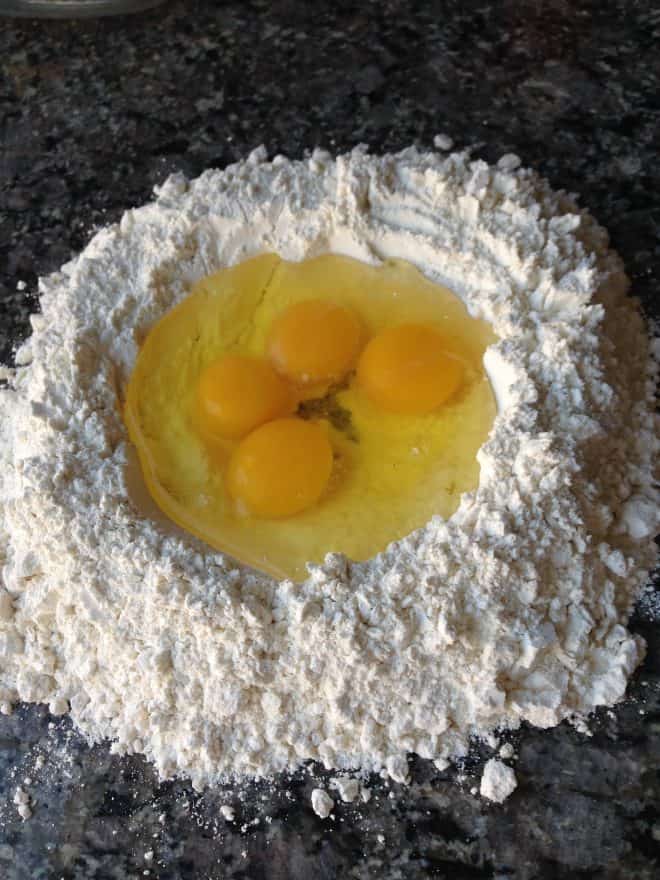
Then using a fork, start to beat the eggs incorporating a little flour with each movement. Use your other hand to keep the liquid from spilling outside of the flour mound.
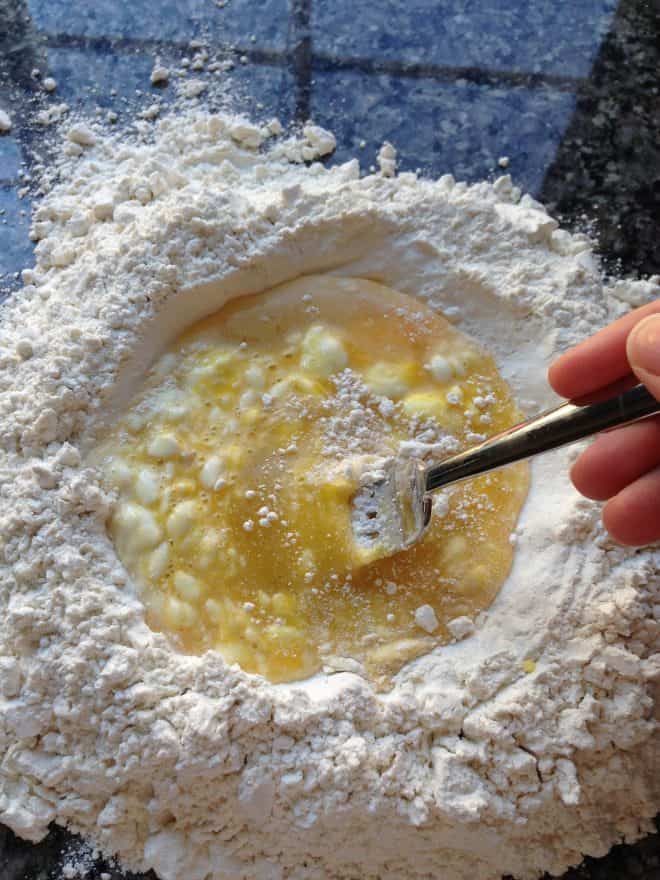
When the egg is no longer liquid, start adding a little water, you can start using your hands to mix. Only add enough water so the dough sticks and forms a ball.
Start to knead the dough using the palm of your hand for about 3 minutes until smooth and not sticky or dry.
When the dough has been kneaded for 3 minutes it should be soft and smooth, cover well with plastic wrap and refrigerate to rest for 30 minutes.
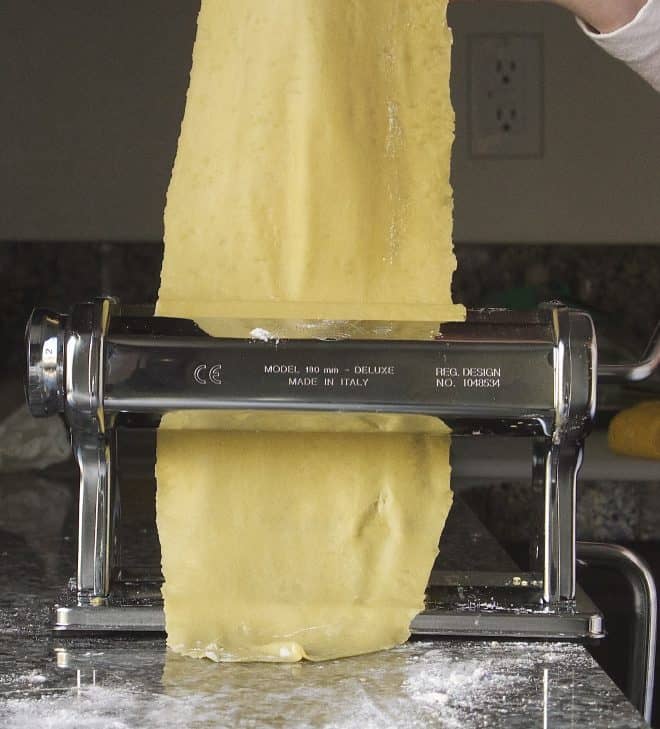
After the dough has rested, cut off a 1/4 piece and shape into a rectangle with your hands. With your pasta machine on the largest setting (usually 1) run the dough through 2 or 3 times.
Turn to the next narrowest setting and repeat. As the dough gets longer, help the dough out of the bottom of the machine and spread out so it doesn’t stick to itself. Repeat this process until you’re at the narrowest setting and the dough is thin. This is number 4 on my machine.
Making tortellini
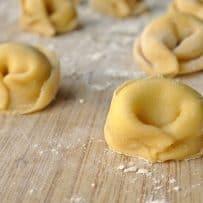
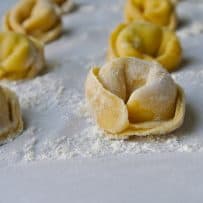
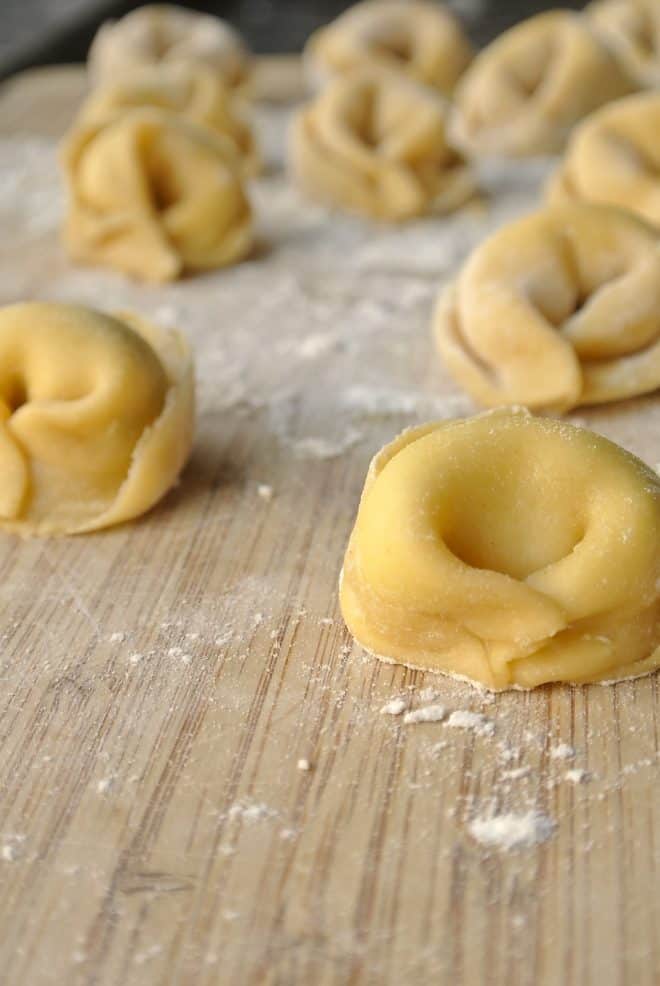
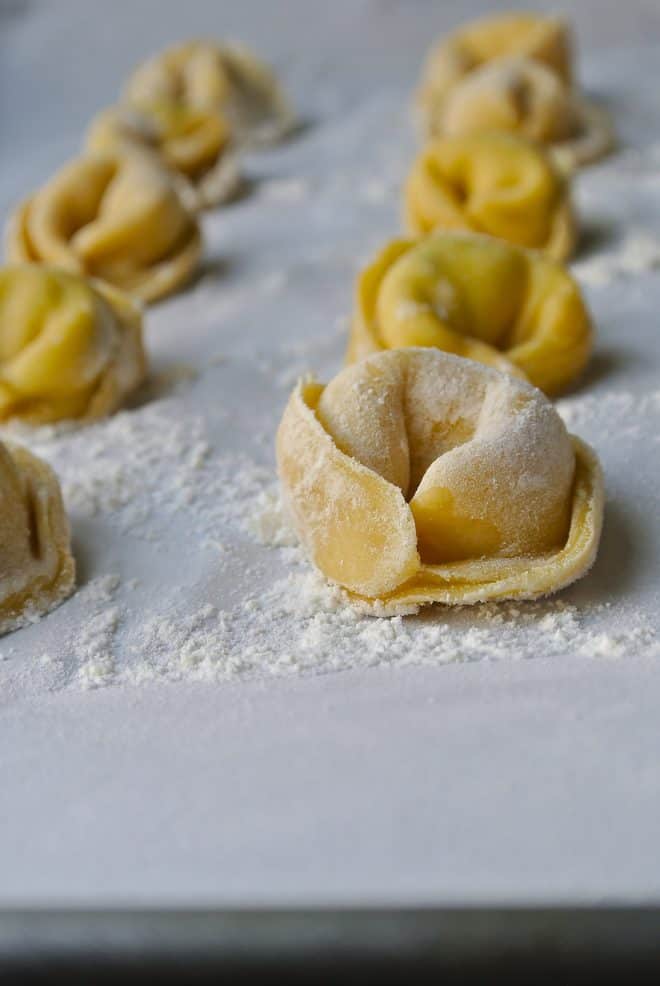
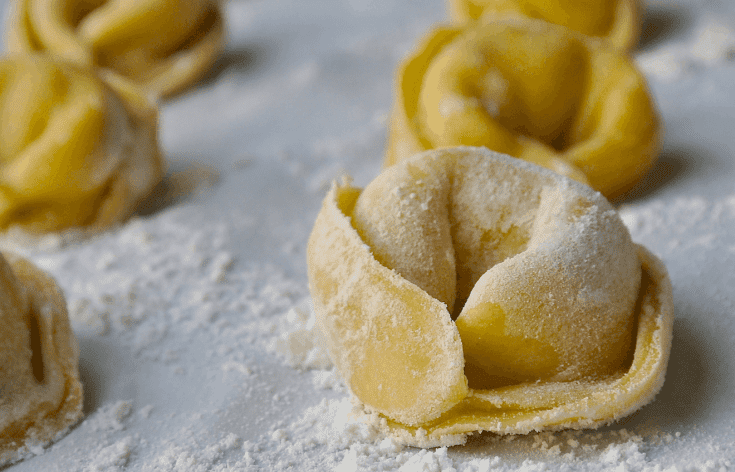
Lay the dough out on a floured surface and using a 2-inch (5 cm) cookie cutter, cut out circles and lay out on a floured surface.
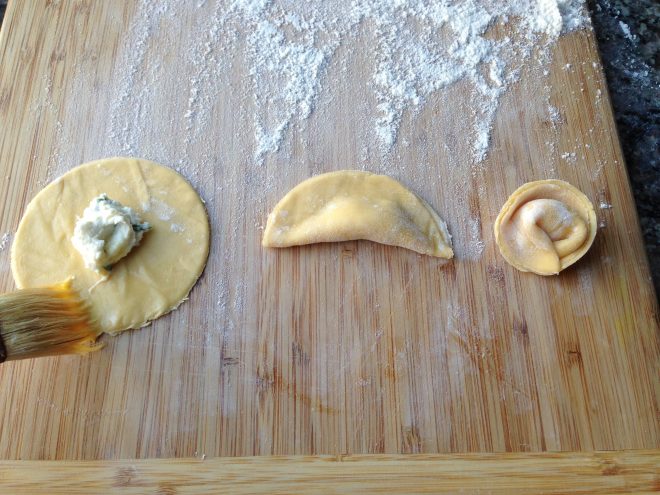
Using the egg wash, brush the half of the round nearest to you. Spoon 1/4 teaspoon of the ricotta mixture into the center. Fold the edge closest to you over the filling to meet the other side, press to seal the edge.
Take the left and right corners and twist them around to meet each other, stick them together using a dab of egg wash with your finger. You just made your first tortellino (that’s what you call 1 tortellini).
Tortellini is boiled in water and is ready when they float to the top. This is a very quick cooking time when the pasta is fresh.
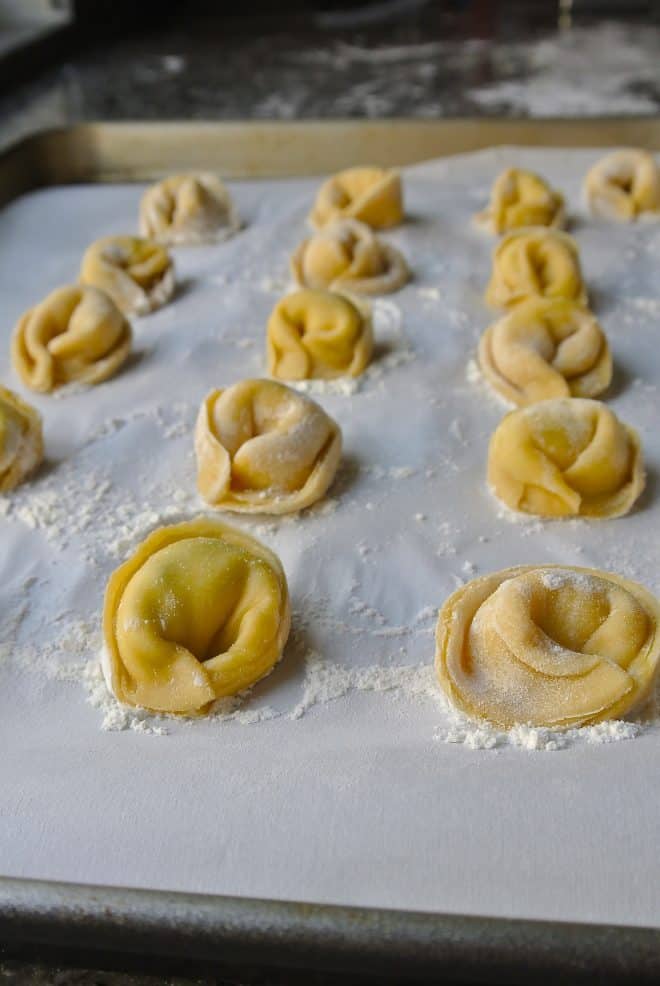
Pre-cooked tortellini freeze very well. To freeze without them sticking together, lay them out on a small baking sheet without touching, and place them in the freezer for 1 hour before transferring to a ziptop bag.
Serving tortellini
You can toss simply in marinara sauce, pesto, add to chicken soup or make Tortellini with Peas and Pepper.
This recipe yields 60 tortellini.
Cheese Tortellini
This is a step-by-step guide to making the perfect dough and homemade cheese tortellini.
Ingredients
- For the dough:
- 3 1/3 cups (519 grams) all purpose flour
- 4 large eggs, room temperature
- 1/4 teaspoon salt
- 1/4 cup (75 ml) olive oil
- For the filling:
- 8 ounces (250 grams) fresh ricotta
- 1 extra large egg
- 1/2 cup (45 grams) Parmesan cheese, freshly grated
- 2 tablespoons fresh spinach, chopped
- 1/2 teaspoon dried basil
- 1/8 teaspoon freshly ground black pepper
- Small pinch of nutmeg, freshly grated
- 1 egg, beaten with 1 teaspoon water for egg wash
Instructions
- To make the dough:
- On a clean work surface, make a mound with the flour and create a well in the middle and add the eggs, salt and olive oil. This can also be done in a large mixing bowl.
- Using a fork, beat the eggs and oil and begin to incorporate the flour from the inner rim of the mound, making sure the mound stays intact with the other hand. The dough will start to come together. Start to drizzle in 1/3 cup to 1/2 cup (about 50 ml) water. You may not use it all, you just need to dough moist enough to come together in a ball. You can use your hands at this point. The dough should stay together, not be dry and not be to sticky to handle.
- Knead for about 3 minutes on a lightly floured surface until smooth.
- Once the dough is nice and soft and smooth, wrap it in plastic wrap, making sure it is well wrapped so no areas of the dough dry out. Refrigerate for 30 minutes to rest.
- To make the filling:
- To a mixing bowl, add all the ingredients until well incorporated. Set aside.
- Directions for using a pasta maker:
- Dust your work surface with flour. Cut a 1/4 piece of the dough, keep the unused portion of the dough well covered until ready to use ( If you are not using the rest of the dough, wrap it well and freeze) Flatten the piece of dough with your hands into a small rectangle in preparation for passing through a pasta machine.
- With your pasta machine on the widest setting (usually 1), pass the dough through 2 or 3 times, guiding with your hands as it comes out, keeping it flat. If the dough gets sticky, dust with flour.
- Reduce the setting by 1 until you get to 4 (which on my machine is the perfect thickness).
- Directions for using a rolling pin:
- Dust your work surface with flour. Cut a 1/4 piece of the dough, keep the unused portion of the dough well covered until ready to use (If you are not using the rest of the dough, wrap it well and freeze) Flatten the piece of dough with your hands into a small rectangle. Roll the dough as thin as possible (but not so that it will break when filled).
- Once you have your dough to the right thickness, use a 2 inch (5 cm) round cookie cutter or drinking glass and cut out circles.
- Brush half of the edges of the rounds closest to you with the egg wash. Add 1/4 teaspoon of the ricotta mixture to the center of each. Fold the egg wash half of the circle over the ricotta to meet the other side. Bring the corners around to the bottom to meet and stick them together using egg wash.
- On an empty shelf of your freezer, spread out parchment paper and put the tortellini in a single layer, without touching and freeze for 1 hour. This makes them easy to handle and they wont stick together.
- Transfer the tortellini to a freezer bag or container and either store them in the freezer, or if you are using them right away, cook in simmering water until they float to the top, about 5-7 minutes and serve with your favorite sauce.
Nutrition Information
Yield
6Serving Size
1Amount Per Serving Calories 374Total Fat 14gTrans Fat 0gCarbohydrates 38g
This nutrition calculation is provided by Nutronix that is only a guideline and not intended for any particular diet.

44 Comments on “Homemade Cheese Tortellini”
Hello! Thanks so much for this recipe! Per allergies in the family I needed a simple homemade recipe and this is it!
Is it possible to skip the freezing step if I’m using them right away? Thanks again!
You can cook them right away without freezing. Enjoy.
How many does this recipe make
60
If I make then ahead and freeze them do I have to boil them in water first or can I freeze from the raw dough and then cook as I need them?
Hi Rachel, the instructions for freezing are in the body of the post above.
I didn’t fully follow the recipe but I did follow what you put as the filling and I added spicy Italian sausage in the filling and oh my goodness so good! I was too scared to make the dough and I was on a time crunch so I ended up buying wonton wrappers and using that as my dough. Ended up pan frying them and adding them to a creamy soup. One day I’ll muster up the courage to do homemade dough
You’ll find that making your own dough is very rewarding. I love the addition of sausage.
Can vegetable oil be used in place of olive oil?
Absolutely, enjoy 😄
If I made a tomato soup, could I put frozen ones in the hot soup to cook? Or would I have to cook in water first and then add to finished soup?
Yes, you can cook frozen tortellini in the soup as you would in water.
Can I use these for creamy tortellini soup?
You can use these for creamy tortellini soup. Enjoy
I meant to update you. These were delicious! I just made a simple garlic butter for them, so the flavor of the tortellini stood out. The only thing I will do differently next time is to roll out the dough to a 5, rather than 4. They turned out slightly thicker than I wanted. But…they were a huge hit for my family. Thanks for posting this recipe!!!
They look fabulous! And I love your choice for a ‘sauce’. Thank you so much for the feedback.
Hello!
If i’m making this 2 days ahead, should i freeze the tortellinis? or will keeping it in the fridge be ok? Also, if frozen, do i thaw before cooking or, put it into the boiling water frozen?
They will be ok refrigerated for 2 days. If you freeze them, you can cook them right from frozen, when they float they are ready. Enjoy 🙂
These turned out beautifully ! So darn good. I paired with a homemade pesto sauce.
Thanks for the recipe!
I’m so glad you were happy with the recipe and pesto is a great choice.
Wonderful pasta recipe and great instructions. I’m happy with how mine turned out.
Great, thank you for sharing.
It mentions olive oil in the ingredients list for the dough, but in the instructions says nothing about olive oil.
Thank you for bringing this to my attention. It looked like a whole sentence was missing from the instructions and I have now correct this. Enjoy.
How many servings does this make? And its 415 calories a serving?
The recipe makes about 50 tortellini, so it depends on how many is served per person. The average is about 4-6 servings. I have refreshed the calorie calculator and it is reading lower in calories.
I have made them now a second time and they come out delicious but super hard.. I don’t know what I’m doing wrong. First time took them out of the freezer and put them in the water without unfreezing. Second time let them de freeze first and both times they came out hard. Why?
Are you making the dough by hand or using a machine? Is the dough hard when you are making the tortellini? Is it rolling out easily? Sorry for all the questions, it sounds like something is happening when you are making the dough. Make sure you are kneading it long enough, but not too much so it becomes slightly elastic. It should be nice and soft and thin when making the tortellini.
Hi, a little bit confused about the sizing it says 3 inches and in brackets 3 cm… They are very different sizes as 3 inches is about 7.5cm and 3cm is about 1 and a quarter inch so not sure which one to use.
Sorry about the typing error, the correct size should be 3-inches (7.5cm). I have made the correction in the recipe, enjoy.
Love this recipe! I made it with my 9 & 12 year old budding chefs.
We added fresh garlic, finely chopped spinach and Italian cheese blend. Parsley and nutmeg in dough gave it that extra touch.
I love that you made it your own Tracy. Sounds delicious and thank you for the feedback and stopping by.
All I need is the pasta maker! I do love that I know how to fold them now, though. Time to wow the kids.
I don’t have a pasta maker either, but I love to make pasta without it! Just use a floured kneading board and rolling pin- it takes more time but still so worth it!
Thank you so much for sharing
Your recipes look great I am going to have to give quite a few of them a try
Wow, you are super talented my friend!!! Thank you so so so much for sharing the great pics
Wow! now You make me want to get a pasta machine. I recently made pasta and had to roll them by hand. You make the pasta making process so easy. I love your tortellini and it will be the first thing I try on my new pasta maker.
I love having a pasta machine. Making the pasta is all about practice, you’ll see the last one is always better looking than the first 🙂
Wow! This is just gorgeous. . I love tortellini but HOMEMADE? Now, that’s a step beyond.
I’ve always wanted to make tortellini but thought it was just so difficult. But you’ve definitely made it easy!
This looks incredible and so much easier than I thought tortellini would be. Thanks for sharing
Thank you Tara, we ate them last night and I was very pleased with the lightness of the dough 🙂
So cute and completely delicious looking!!!